
The Staircase Restoration Project is On!
[EDIT: Due to the realities of the pandemic, the Staircase Restoration Project is on hold. 😢 ]
It’s time to talk about The Staircase Restoration Project! Woo Hoo!
THIS IS A BIG DEAL! Last fall I posted Meet our Stairs, where I introduced you to our sad, but hopeful 167 year old staircase. It has lived through the Civil War, it survived the many families with children running up and down them, and it survived our house being a neglected rental for almost the entire twentieth century while the surrounding neighborhood went through a deep economic downward slide until gentrification came along beginning in the 90s.
Before I get you sucked into our staircase project post, I must warn you this is longer than most of my posts. Lots of words, lots of pictures… So grab a cup of coffee or tea, a glass of wine, or mix up a dirty martini (my favorite), sit back and allow yourself to get sucked into our staircase… You won’t regret it… I hope.
First, let me show you an inspiration photo of the look I am hoping to achieve in the end. It won’t of course look like this (there will be more ambient lighting), but this image makes my heart sing with joy.

[Image: This early nineteenth century staircase is not all that different than ours. It’s a bit simpler in design, but the parallels are there. Even with all of the imperfections which you can easily see, it is perfect to me. Source: Lone Dakota Photography]

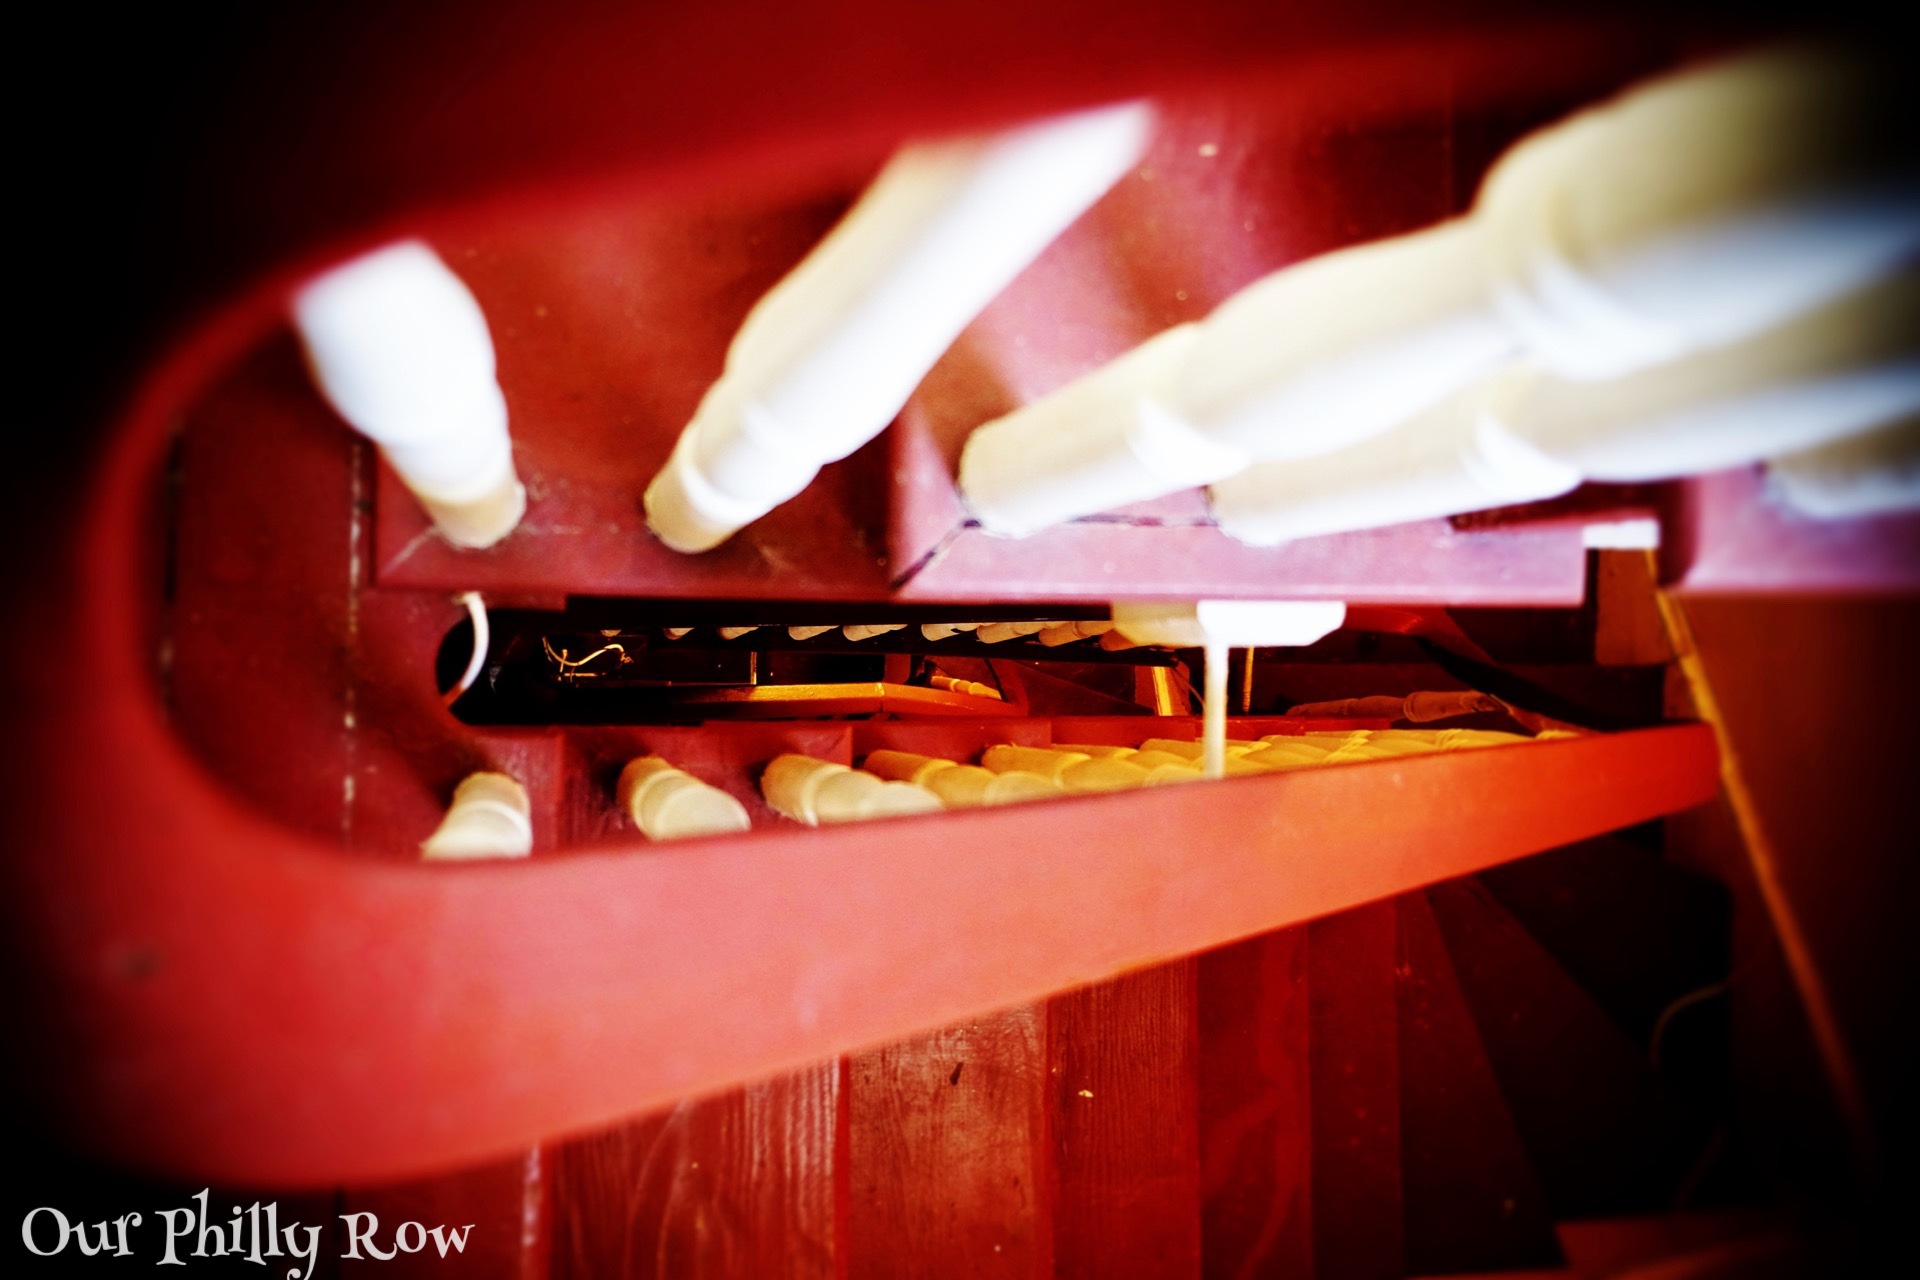
[Image: This is a winter view of our stairs looking down from the third floor, as seen a couple of years ago. It’s pretty, but there are issues.]
I quickly learned that a staircase company was not the right direction to go, I needed to find someone who is not just skilled, but a master at restoration carpentry. Thus the search began. I found somebody fairly early whose website featured beautiful historic staircase restorations, and after reaching out to him, he responded that he has moved onto custom furniture and no longer does staircases… This is where my search sat for about two years.

[Image: This is only here because it is a pretty picture of the stairs detailing the beautiful craftsmanship. The blue light is the daylight coming in from the third floor landing.]
The question I kept asking myself is “How is it that Philadelphia, a city with the largest collection of pre-Civil War houses has so few companies who specialize in restoration? A few weeks went by and I once again dove into the Googles searching for unicorns. And then a nugget of gold… What I had missed all along was the search term “restoration carpenter”. Suddenly, I stumbled on a handful of companies who focus on restoration carpentry. Unfortunately, most of them are only looking for big jobs and/or commercial clients. But buried among the links was R&B Restoration Carpentry.
“R&B specializes in the sympathetic preservation and enhancement of historic buildings.” This is the first thing they say on their home page. The company is owned by Matthew Roberson and James (Jimmer) Breen. Between the two of them, it was clear that they have a lot of experience doing what we needed done, which gave me a lot of comfort that I would be in good hands.
I sent a message describing what I was looking for and a link to photos of our staircase, and heard back from Jimmer, one of the principles. Yes, they do take on staircases, and yes they do residential work, and yes, they would be happy to come out to look our staircase over and work up a quote.
Unsure of just how much it would cost, we braced ourselves for the worst… And were relieved when the quote came in fairly reasonable given the level of effort that would be required. So, we signed an agreement to move forward. That was last September… Because R&B is not short of projects they told us it would be several months and we would need to wait our turn. This wasn’t a big deal because I was dealing with much bigger issues (cancer).
Because of the scope of the project, I have decided to tackle the project in three phases. The rest of this post will focus on the first stage and the work that R&B completed. I will address in detail the other two phases in future posts, which I expect will take several months to move through the phases with the goal of having the entire staircase restoration project completed before the end of the year.
- Phase One: Handrail Restoration.
- Phase Two: Paint Removal and clean up.
- Phase Three: Refinishing treads and handrail, followed by priming and painting.
Phase One: Handrail and Baluster Restoration (Completed as of this past Friday)
As I touched on above, the handrail had been abused and neglected for decades. The repairs were poorly done and haphazard at best. The handrail was very loose and wobbled enough that both my mother and my mother-in-law were both quite concerned the first time they visited the house back in 2017. Before my mom passed last year, she would often suggest that we make the staircase restoration a top priority. (Sadly, she only saw the house once.) Same story for my mother-in-law, she would nudge Yoav to make it a top priority as well.

[Image: I am sure you can guess which one of these is an original baluster. After moving in, we found this one lonely baluster in a closet and fortunately for us, somebody took the time to strip it. Our carpenter noted that it was poplar, and was probably always painted from the beginning. R&B had ten new ones turned out of poplar for replacements. In the end, they will all be painted as they were from the beginning. Source: Instagram – @rbrestorationcarpentry ]
Now for the pictures…. Rather than go into detail and bore the crap out of you, I’ll caption the photos explaining the work done with a few interjections. But….
Here’s the thing…. None of this is really pretty (except for the newel post cap at the end), so while I hope you enjoy the photos, I will understand if you never want to visit this site again. Who am I kidding? I will be sad if you don’t stick around… I assure you, there will be prettier things to come.

[Image: These are just six of the many joint repairs completed by our carpenter. They have been re-doweled and bonded with epoxy and should last a very long time.]

[Image: This is a picture from a few years ago showing the abrupt ending to the handrail into the window. We know the window has always been there, but we couldn’t figure out what the original intent was. Also, it was clear that there was an additional baluster here, which we replaced.]


[Image: This was the solution to the handrail randomly ending in front of the window. It’s not ideal, but so much better than the hunk of wood nailed on the underside.]

[Image: This angle gives a clearer picture of how the issue of the dead end handrail was managed with a piece of poplar across the window. You can also see new baluster and where the handrail joints have been repaired.]

[Image: This is one of the joints under repair using dowels and epoxy. After everything dried, it was sanded and smoothed out.]

[Image: This is one of three areas which were poorly repaired sometime in the past 30 years using corrugated cardboard and epoxy. What where they thinking?]

[Image: Another section badly patched with epoxy and corrugated cardboard, and metal straps screwed into the sides. We couldn’t figure out what the hell happened with this joint originally to cause it to be so poorly patched.]

[Image: This is the fix of the joint shown above. Our carpenter carefully cut out the bad repair and used a 19th century piece of mahogany to fill the gap. Once finished out, it will blend quite well.]

[Image: The sexy curvy goodness of our handrail never fails to warm my heart. Think about the complex math involved in creating this back in a time when everything was done by hand. Having these lose joints repaired makes it all that much better.]
Along with fixing loose handrail joints, they replaced several missing balusters. In all, they replaced six balusters and installed one that was missed on the lower landing during construction. We know this because there was a hole drilled on the underside of the handrail, and the identical configuration on the landing above had a baluster in the missing spot.

[Image: Before: This is the first landing where two balusters were missing. One of them was genuinely missing, the other was intended to be there, but never installed.]

[Image: After: Looking at this picture, it only makes sense that this new baluster should have been there all along.]

[Image: Here is where we discovered the hole drilled in 1852 on the underside of the handrail and added the missing baluster.]

[Image: This is just a sample of the variety of work done. From patching a cracked bull-nose on the tread, to re-configuring how the balusters should have been. You can see that we filled the spot where there was one and installed two, which is a better solution.]

[Image: This is the other of two treads where the front edge was broken from the countless people stepping on the edge as they came down the stairs.]

[Image: In addition to replacing missing balusters, they also needed to shim the existing balusters to tighten them up. Here you can see how the balusters are dovetailed into the floor boards/treads. They were all tightened up with shims before a newly crafted piece of bull-nose trim went back on. Also… notice the last remnants of an endless amount of telephone wire.]

[Image: This view shows several different repairs having been completed from new balusters, new bull-nose trim pieces, and more. And yes that is a portrait of Elizabeth Taylor found on eBay.]

[Image: In addition to replacement balusters and wood trim, R&B had a blacksmith forge three new replacement brackets from iron. They offer a tremendous amount of stability without visually taking up too much space.]
Are you still awake? Hello?… You are?… Great!… Hang tight… We are getting close to the end I promise… Just two more things….
Before serious work got started on the handrail, our carpenter needed to determine wood species. I had always assumed it would be cherry, which was fairly common for staircase handrails, but my carpenter suggested it may be mahogany based on input from someone he knows. We needed to determine which it was so that our carpenter would use the correct wood for repairing the damaged sections. To find out, I got out my trusty Speedheater Cobra, and in a couple of minutes, I had a nice long section of wood stripped down. I created the following video of the reveal for my Instagram stories. The other voice you hear is Yoav’s. (The vertical video is well… The realities of Instagram.)
So, now that you can see that the potential for our handrail is truly amazing, I want to address the newel post cap. In the video I noted that it was definitely not mahogany, but wasn’t sure what the deal was… It turns out that it is not the original newel cap.

[Image: This is the newel post cap we removed. The wood species is mismatched and it felt somewhat rudimentary in how it was made. Clearly not original.]

[Image: The poorly finished underside all but confirmed that newel cap was not original.]

[Image: This is how newel post caps looked during the mid nineteenth century, so it was a no-brainer that we needed to have one made to restore our staircase appropriately. Source: Legacy Vintage ]

[Image: For a fair price, R&B was able to have their wood turner make us a custom cap out of mahogany. The style is very much in keeping with the period of the house.]

[Image: Side view of the new mahogany newel post cap.]

[Image: Installation of The new custom mahogany newel cap was completed this past Friday. I plan to strip the newel post itself (assuming it is also mahogany).]

[Image: This is how it looks with a quick rubdown of mineral spirits. There remains much work to do, but this hint of what it can be is quite exciting!]
So, how do I feel about the quality of work that R&B did? If you have read my blog for any length of time you’d know I am not generally here to promote companies or products. However, I can happily say I am quite satisfied with the work R&B did… It’s not exactly pretty at the moment, but that has nothing to do with their work, it won’t be until everything is done that their work will truly shine through. It’s vitally important to establishing a foundation to complete our staircase restoration project.
Thank you for sticking this one out… I know it was long, but if you are half as geeky as I am, I’m sure it was worth it. I also hope that if you chose the wine or martini option, you are still awake.
WHEW! So, now that phase one is completed, I will be looking to address the layers upon layers of paint slathered on over the decades. That will be phase two and detailed in a future post. For now, it just feels wonderful knowing that the stairs are no longer a hazard. I am sure my mother is resting just a bit more soundly now.

[Parting Image: During the process the old newel post cap had to be temporarily held in place, and this was the best option at the moment. I couldn’t resist posting.]

Count me in…..I’m a restoration junkie from way back! This is absolutely fascinating and I can see the beauty of this staircase being exposed right before our eyes…..it was already a beauty, but you know what I mean.
I’ve been following along since before y’all moved to Philly, so I’ve been hooked with this next chapter in your lives.
Blessing to you and Yoav 😘
Helen, Glad you are still on board! 😊😊
You were there to root me on when we first officially arrived in Philly! 🎉🎉🎉
The staircase was, from the beginning, one of the things we fell the most in love with. The idea of restoration has been daunting, but now that it is solidly repaired, we are super excited to be moving onto the next phase (which will probably take a few months given the current events).
This is so what we all need today Devyn. It is so uplifting to see the progress and to feel your renewed motivation and enthusiasm between the lines. You tackle each problem with a wonderful blend of perfection AND compromise. Clearly this is not your first rodeo! That third floor handrail must go down as 2020 winner of the “What Were They Thinking?” award but your solution is the epitome of an elegant compromise.
Can’t wait for the next installment……
Thanks Gary 🙏
I began writing this post out over a month ago, but then it dragged out over several weeks because I thought it probably made better sense to wait until our carpenters were finished to capture the scope of what we are working with. In the course of that month, hell, just this past week, so much has changed. 😳😳🤪
I like the notion of perfection AND compromise. An old boss of mine wrote on a review that “Devyn tends to be a bit AR (anal retentive)” to which I responded by crossing out “AR” and adding “Thorough”. Perfection is impossible, but giving up too soon is not going to work for me.
As for the third floor handrail, it remains a mystery. We do know that the house was built on spec, which was quite common at the time. We are learning that the builders missed a few details (such as the forgotten baluster) that have added mystery to “What where they thinking?” The solution we went with isn’t likely how it would have been handled, but the cost to alter the course of the handrail to either end below the window frame or route towards the right and into the wall to the right side of the window would have been cost prohibitive, especially given that this is the third floor which is seen by almost nobody… Ever.
Yes, still awake, and I chose a fifth option, beer. What a fun journey! I’m very impressed with the repairs, especially the infill of mahogany on the second floor. Quality repairs like this add both interest and value (unlike the botched “repairs” using cardboard). The delightful newel cap is also a vast improvement over the previous replacement! And the iron supports are respectfully inconspicuous and so essential.
Have you determined what the newel post itself is made of? Hopefully it, too, is mahogany. I really like combination of painted and varnished wood seen in the photo of the early 19th c. stair. The alluring curves of your staircase are every bit as dramatic and beautiful as those found in more palatial houses. Your restoration will ensure that it will continue to be valued by future generations… can’t wait to see how
this progresses!
Ah yes, beer! That certainly works as well and would never be discouraged. 😂😂
I am thrilled with the repairs overall. Our carpenter Matthew has a masters degree in historic preservation planning and applies that to his work. You will note that the mahogany patch is cut at an angle on one side. When I asked about that, he said he didn’t want to remove any more original material than was necessary, and felt that the angle cut was more appropriate. This was the right answer and just more confirmation that we found and hired the right people.
I rather like the iron supports. There were some in place before, but they were inadequate and painted white which made them stand out. These are custom for our situation and blend in just fine. The custom turned newel post cap ended up being an extra cost of $100, which was totally worth it. As for the wood under all that paint on the newel post… I am admittedly a bit reticent at diving into another messy project at the moment, but I suspect my curiosity will get me and I will be bringing out the Speedheater to reveal what lies under all those layers of paint. I do hope it is indeed mahogany like the handrail.
The curves are alluring for sure! The simplicity of the staircase belies the incredibly complicated compound curves of the handrail and skirting boards. In chatting with Matthew, we both believe the balusters were stock items from a suppler, and sections of the handrail could have been as well, but those tight compound curves were most definitely crafted onsite during construction. And all done with hand tools to boot. 😊
Maybe you could test a small, inconspicuous, spot on the newel post before removing a large swath of paint. Perhaps on the base? The compound curves of the handrail are simply stunning… I weep for such lost craftsmanship, but am glad that examples such as your handrail still survive.
Can’t wait to see the reveal as you start to remove all those layers of poorly applied paint. It will look wonderful. Would it be possible to make the odd-ending on the 3rd floor look less of a WTF and more intentional by sanding it to a ball curve or whatever at the end instead of just an abrupt saw-cut or do you have other plans eventually? Whomever planned this house/staircase doesn’t seem to have given it a lot of thorough thought before building it.
That is fabulous and not boring at all! Can’t wait to see the next steps and the finish!
Very exciting tour! Well worded and well done. This is a big project, and will be so satisfying when done! I opted for coffee, but am working from home, so may need to remedy that. . .
I am also curious about your Cobra. I have one too and love it. I have not, however, used it on finish grade wood. Do you just have to be twice as careful about scorching? I will admit I got a little careless on paint removal of wood to be repainted, and was glad I was painting it again. I have some finish grade wood next, so am thinking about that a lot.
[…] Wow… In what seems like just a few days since I wrote my last post, the world has changed dramatically… The last time we humans experienced a global pandemic of […]
Devyn your guy did great work. Even greater to see the custom wood work replicating the original! The easy way out would be an off the shelf replacement. The world needs more old home folks like you.
Ron (Gothichome)
Thanks Ron 😊
They did a fantastic job… But this isn’t the kind of work you can go cheap on. Skill and craftsmanship have a price.
Unfortunately the remainder of the project is on hold with all that is going on in our crazy world right now. I hope to pick it up again next year.